Essay Series — Blog Post (continued)
Why Format?
A blog post is not a book. It’s not an article. It’s not even an essay. An essay has one main purpose — to communicate to the reader the point the writer wants to make. This could be informing, changing an opinion, teaching a topic, or sharing an anecdote.
But a blog post has many purposes in addition to its content. Yes, it does the same things as an essay but it has a multitude of different ways to convey information in the fastest, most efficient way possible, not all of them text-based. A blog post has other purposes as well — many of them different types of actions, attempting to get the reader to do something in addition to simply consuming the content.
Scanners Only Stay for 10-15 Seconds

People don’t read online in the same way they do the printed page. Online, they’re more impatient, often leaving web pages within 10–20 seconds. However, those pages they find relevant or interesting can hold their attention for much longer. Therefore, to gain several minutes of your reader’s attention, you must attract their interest immediately and clearly communicate the value of your content within the first 10 seconds.
That’s not long at all, but there are ways to make sure your viewer gets the gist of your post within that critical 10 seconds.
Every reader who clicks on a blog post expects to leave with something — an answer, a resource, or a next step, so your goal is to give them what they’re after in the most efficient way possible — using formatting.
 1. Headline or Title
The first way to do this is by using a headline that summarizes your post’s premise or thesis statement. This is the main topic or point. It’s what your entire post is about.
You should capitalize each word of your title that’s not a connecting word and all words over five characters. Example: How to Cure Writer’s Block in Three Easy Steps
Don’t use too many words (4-8) and keep them under 70 characters. The search engines — Google, Bing and Yahoo all have a visible width of up to 70 / 71 / 71 characters each. A longer title won’t be displayed in search results. To check your character count, go to: https://www.lettercount.com/
2. Subheads or Section Headers
People are reading your content on their phone, so the text is tiny and they’re scrolling fast.
Formatting makes the most important ideas and concepts the most obvious and therefore easy to consume. Subheads every two or three paragraphs help break up your text so readers can easily jump to the information they want most. Section headers correspond to your post’s outline as described in our previous article on informal essays.
Like essays, blog posts are made up of one thematic idea which is validated and reinforced by several supporting ideas. Create a subhead that summarizes each of these supporting ideas in a few words. This lets a scanner skim quickly through your post and decide if they want to dig deeper.
You can use different sizes of subheads to indicate the importance of each supporting idea. <h1> header tags are only used for the main title, but header tags in sizes descending from <h2> to <h6> can help break up the text and show the relative values and significance of the information.
3. Text Formatting
Bold, italic, colour and blockquotes offer variations that you can use to break up large pieces of text. By default, browsers make all heading tags, <h1> through <h6>, bold. You can also bold or italicize certain words, links or phrases for emphasis.
Format your text to emphasize what’s important. Example:
- Bold specific words or sentences to draw readers’ attention.
- Italicize titles, foreign words, or proper names.
- Blockquotes let you emphasize a supporting quote from interesting figures, by indenting the block of text.
- Underlining is associated in readers’ minds with linking, so avoid underling any text for emphasis when that text is not a link.
- Use COLOUR to emphasize a particular point.
4. Lists
Use lists to make your information concise and scannable. Readability is instantly improved with the use of bulleted and numbered lists. Use bullet lists when the order of the listed items doesn’t matter or the list is short, and numbered lists when the order is important.
You can use lists whenever you have several related options to share with your readers. Example:
- Reasons, further background information
- Resources, software, reading material, tutorials
- Links, websites, related information and downloads
- Supplies, requirements for particular tasks
- Step-by-step instructions
- Opportunities, further possibilities
- Products, offers
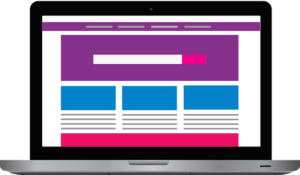
5. Images

Images can often convey more information at a glance than a whole page of text. Images appeal to emotions and tell a story. Images also help to break up long copy, making the post easier to read.
Every post should have at least one image, usually a header image. Use images, videos and gifs, infographics, diagrams, and charts and graphs to explain complicated subjects, draw attention to a concept or clarify an idea.
Embedded videos or podcasts can satisfy the reader’s desire for valuable content and keep visitors engaged for longer than a simple text article could.
Make sure your images relate directly to the point the section is trying to make.
It’s possible to use free images from sites like Pixabay, Pexels or UnSplash, but you must never simply grab any random image from Google or other sites. Most images are copyright-protected and require licensing and payment, or at the very least, a backlink to the supplier’s page, crediting the photographer or artist.
Infographics — An infographic is a visual representation of information or data, such as as diagrams, flowcharts, pie charts, explainer videos, and so on. Infographics can present complex data in a concise, highly visual way, making data-based, educational information engaging and easy to digest.
By combining elements of text, image, chart, diagram and/or video, an infographic presents data and explains complex issues, quickly leading to rapid insight and better understanding.
You can create your own infographics using an image-editing software or go to Infogram.com. (I have not used this site, so I can’t say how well it works, but they do have a free trial.)
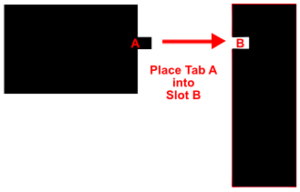 Callouts — Another type of infographic. Often used in manuals, technical specifications, and other technical materials, a callout is a specific area of an example or image that explains what it’s describing, using an arrow, line, or number.
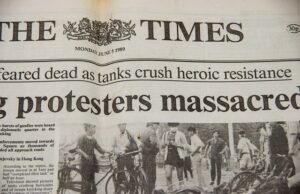
Image captions — Image captions convey vital information about who’s doing what, when, where and (sometimes) why. Solid captions paired with interesting photographs can spark a reader’s interest in the full text of your story.
For good captions:
- Check the facts. Make sure your information is accurate.
- Captions should add new information — background, who’s involved, why they’re doing what they’re doing, setting/location and timeframe.
- Always identify the main people in the photograph.
- A photograph captures a moment in time.
- Conversational language works best, just as in the rest of your blog.
- The emotional content and impact of the caption should match the tone of the image.
6. Sentence and paragraph length
Chunking — Keep sentences and paragraphs short and content-rich. Chunking your content into shorter paragraphs makes it easier to digest. By keeping your sentences and paragraphs short, you give the reader more whitespace — a visual pause which allows them to process the information faster.
Sentences — Keep your sentences short (2-12 words).
Paragraphs — Keep paragraphs to 2-5 sentences in length.
Text Width — most blogging platforms automatically format text for multiple devices, but try to keep your copy to 80 characters per line or fewer for scanning on phones, so readers don’t have to keep scrolling back and forth to read the copy.
7. Visual Whitespace
Additional whitespace has been shown to increase reading speed and comprehension.
Use plenty of whitespace to separate ideas and create a visual flow between your sections, paragraphs, images and other elements on the page.
Whitespace helps communicate information clearly, guides the users’ eyes throughout the page and gives a general feeling of visual harmony. Having plenty of space in your posts can make a huge difference in how your content is displayed, and even how much information people retain from the content you’re providing them.
8. Links & Navigation

One of the big advantages a blog post offers is that of linking and internal navigation. Almost any web site will employ the use of navigational links, also called hyperlinks — either within the same web document, within the same web site, or to another web site. You can use this capability to provide additional information or send readers to a promotional offer, give them a download bonus or freebie, or ask them to opt-in to your email list.
Links must be clearly marked and distinguishable from the rest of the items on the page. Use underlines and different colours. Underlining is associated in readers’ minds with linking, so avoid underling any text for emphasis when that text is not a link. For more information on hyperlinks, Click HERE.
To create a link on your page, highlight the phrase you want to use, (as the “Click HERE” above). Copy the URL of the page you want the link to point to, and, in your blogging software, use the “insert link” option. It’s a good idea to have the link open in a new window/tab, especially if you’re linking to another website, so when a reader closes the new tab your site will still be open in their browser.
It’s also a good idea to go back to older posts and link to your new ones. You can also add links to specific pages. Social media is an obvious place to share links that generate inbound traffic.
Download links and free bonus content — Many blog posts offer tutorials and information for readers. Sometimes readers want more information than the blog can provide, and one way to offer valuable content is through free or paid downloads, often in return for the reader’s email address, so you can add them to your email list. Example: Here’s a link to my own Blog Post Template.
Ads and links to affiliate products — You can use your blog to link to any offers of your own products, or affiliate products for which you receive a commission on sales. Example: I am a member of Joseph Michaels’ Unchained Writer membership site. This group has entirely changed the way I work. Every day, one or more times a day, I get together online with other writers to work on our various projects. I’ve gone from a sporadic “work when I feel inspired” a few times a month to a solid writing career through the accountability this group fosters and encourages. If you click that link and join Unchained Writer, I receive a small commission, but the cost to you is the same as if you were to find the link on your own.
Many blogs are review sites whose entire income comes from this type of linking strategy.
9. Focus on SEO and keywords
If you’re new (or new-ish) to blogging, you may be unfamiliar with the role SEO or Search Engine Optimization plays in how your posts are found by the search engines.
There’s a lot to it, but the easiest way to rank for the search engines is to keep your posts focused on a specific keyword or phrase. Search engines determine a post’s relevance based on how often a particular keyword is used in the post.
The idea behind SEO is to get the search engines to rank your chosen keyword high in the search results, so when you focus your content on that keyword, the post is more likely to show up on page one.
Use your keyword or keyword phrase in your main title — the title uses <h1> tags, which are given more ranking value.
Try to get your posts linked from outside sites, social media and even from your own internal pages. This tells the search engines that your content is relevant.
Name your photos and images using your keyword in the <alt> tag and caption.
10. Calls to Action
Depending on the purpose of your blog, often you want your readers to do something when they’ve read the post. It may be taking some kind of action based on the content of the post, such as completing a series of exercises if it’s a tutorial or training post.
Alternatively, you may ask for your readers to like, share or follow your blog or podcast, or link to your post from their own blog or website.
11. Scheduling Your Posts

Frequency: How often you post is less important that how consistently you post. Many new bloggers try to do too much too soon and burn out, because they can’t keep up with a schedule that’s unrealistic. When you start, you’re full of enthusiasm and a dozen ideas for blog topics, so you tell yourself and your followers you’ll blog every day, but if you lose steam when you can’t think of a topic for the next day’s blog, you may disappoint them. Better to blog less frequently, but consistently.
As long as your readers know your schedule, and that you’ll be posting new, intriguing content every Tuesday (or whichever day best suits your personal schedule), they’ll be content to wait for it. But if they expect you to post every day, and you miss a couple of days through illness or inattention or family issues, they’ll lose patience. Some bloggers only blog once a month, but the content they post is worth waiting for, and their loyal readers know this.
Scheduling: Scheduling your posts is easy with most blogging platforms. You could hit publish as soon as you’ve formatted your draft, but most blogging platforms allow you to schedule your posts, even batch them so that you can write a month’s worth of posts at once, and then set them up to go live at predetermined times. For a video on scheduling your posts in WordPress, go HERE.
12. Final Words
- Remember the point of your post and tailor your keywords accordingly. What action or reaction do you want from your reader? Is it an opt-in to your list? A like, share or follow? A comment? Or do you want them to take action on a step-by-step process you’ve outlined? At the end of the post, reiterate what you want them to do — your CTA (call to action).
- Make the best ideas the most obvious. Subhead the point of each section. Bold the point of each paragraph – Why it’s useful, who’s it for, what it does, how to do it/tutorial, exercises, etc.
- Make it easy for the reader to find what they’re looking for. It’s not as important that they read the whole thing as it is that they quickly and easily find the information they need.
And, once again, here’s the link to my own Blog Post Template.
Happy Blogging!

Beverley Hanna
Trained as an artist in the late 1960’s and early 1970’s, I was one of the first creatives to be employed in the computer graphics industry in Toronto during the early 1980’s. For several years, I exhibited my animal portraiture in Canada and the U.S. but when my parents needed care, I began writing as a way to stay close to them. I’ve been writing ever since. I run a highly successful local writer’s circle, teaching the craft and techniques of good writing. Many of my students have gone on to publish works of their own. I create courses aimed at seniors who wish to write memoirs, with a focus on the psychology of creatives and the alleviation of procrastination and writer's block.